

Hello everyone, it’s Shelfy and today I’m here with some instructions on how to create the Lancer from Gears of War out of perler beads.
Materials Needed:
- Perler beads
- Black
- Gray
- Dark gray
- Electric/ Light blue
- Red
- Clear
- White
- Optional: Metallic gray
- Peg boards (10 large size, these boards attach to one another)
- Ironing/ perler paper
- Iron
Creating the Perler Piece:
Because this is simply one giant perler piece all you need to do is follow the guide below to lay out all the beads appropriately. I will say that this is certainly a process and it took me around ten hours total to lay everything in its appropriate place and another hour to iron the front side together. Have patience, you can do it!
I have some helpful tricks for you though so please continue reading!
Initial Outline:
I based the shape of my lancer off of a pixel art gif I found. However, I thought that the color pallet on the gif was too light and I wanted to darken it. Therefore, I started laying out dark colors first. I replaced many of the darker shades of gray with black and made some of these lines a few beads thick so as to make lots of shadowy areas on the Lancer. I also placed the electric blue beads down when laying out my preliminary outlines as since there were only a few blue areas they serve as a nice guiding point to lay out other beads.
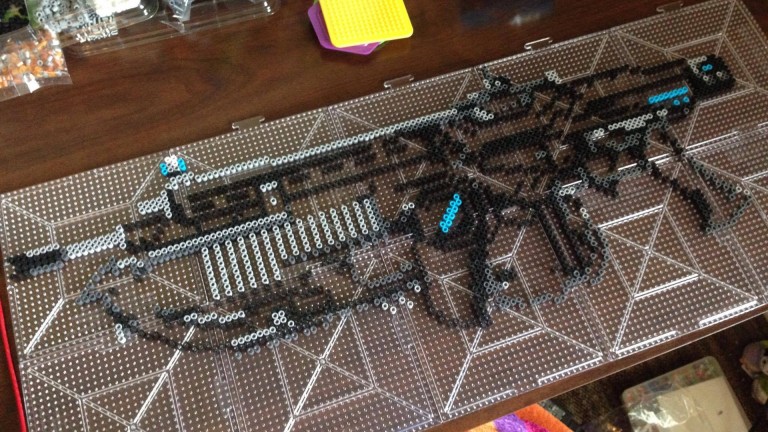
Filling In:
Filling in the rest of the Lancer once the initial outline was not too difficult. I used my judgement as to where to put dark gray or light gray. I wanted to put more light gray toward the front and top of the Lancer and more dark gray toward the back and bottom.

Slight Customizing:
Once everything is laid out on the peg boards I replaced some of the tips of the chainsaw tips with red beads, to simulate like the Lancer had just grazed an enemy. Finally, a few areas of the Lancer needed support with some clear beads. Anywhere where the beads barely touch on a diagonal will need some support.

Ironing:
The most important tip I can give here is to work slowly!! Because this piece is so big beads can shift and move off the peg boards and stick where you don’t want them to. If possible, I recommend buying the big sheet of ironing paper where you can cut one piece to fit over the entire project. With a big piece like this do not move in circles at first as this will more easily cause perler beads to shift where they should not. Simply move your iron in once direction in a gentle linear motion, like petting a dog or cat. Another important tip here is to give the edges and thin lines of your Lancer the proper attention they need. Edges need to be properly fused too and because this piece has such irregularly shaped edges, it may not always fuse right away. Finally, I also recommend that you iron the other side as well. The perler Lancer is extremely fragile as it is and so ironing the other side is critical here.

Cooling Flat:
As freshly ironed perler beads cool, they can sometimes curl and dry with a curve. When ironing the first side, don’t worry about your piece curling – we can fix that when you iron the other side! To help your piece flatten as it cools do not peel the ironing paper off, allow the piece to cool down and the paper to slide off on its own. Another strategy to help your Lancer be as flat as possible is to get a small towel or oven mitt and gently press down on areas that are curling as they are cooling. Applying this pressure can help to a degree. Lastly, placing a heavy object on top of the Lancer once it is lukewarm helps as well. I used my biology textbook as my heavy object. You can leave the weight there long after it has cooled for even further assurance as well.

That’s it! If you pulled this off, you’re super cool! Be sure to subscribe to my YouTube channel for more random things!
